Vortex's Veg Patch

It's always difficult to know where to start - usually on a suitable piece of ground would be a good place. So is my new patch suitable - I suppose so. Time and effort will tell 

In many ways I'm lucky. My garden is surrounded on two sides by walls, on a thrid side by my new fence, and on the other side by the house. This makes it akin to a Victorian Kitchen garden, even to the extent that the vegetable patch is at the southern end and gets the sun from about 07.00 till 20:00 in the height of summer.

Of course the down side is my soil - it's as dry as a dry thing and has the water retention capability of a desert. 

So why and I digging this new vegetable patch?
Well I started out some 4 years ago with just a small square patch - the area in the photograph beyond the bare turned soil.
This was just to grow some sweetcorn we'd been given.
The year after I decided I needed a bigger area and started a new patch on the other side of the garden.
Last year I extended it further, mainly to grow potatoes. Then I managed to acquire a greenhouse - the highlight of last year - the lowlights being the theft of my Landrover on 7th January and being made redundant on the 3rd May.
The Vegetable Patch in Progress
The Greenhouse I acquiredOf course I needed somewhere to put the greenhouse - and the best place was where I'd put the vegetable patch.
I'd also expanded my repertoire last year into growing tomatoes and cucumbers - courtesy of some 5 year old seeds from my mother-in-law.
I'd housed these in a temporary greenhouse I'd fabricated from some 2"x2" softwood and some clear plastic. This meant that I couldn't think about doing anything in regards to setting up the greenhouse until November.
The other problem was that the ground slopes - the ground at the front right as you look at the green house is 12" lower than the back left
This meant I had to stand it on a base. So in late November down went the 4" thick 6" wide concrete slab and a single layer of bricks on which to stand the frame. I thought I'd got it level - but it still slopes by 3/4" back to front, which of course is the wrong ******** way!
Now whilst it only took me 8 hours to take down on my own, it took me three weekends with my father-in-law's help to put it back up again.
The plan for the greenhouse had always included a raised bed - a feature inherited from my wife's grandmothers greenhouse. So on a cold weekend in January down went the concrete ring on which the raised bed was to be built.
I'd previously acquired a job lot of brick paviers, courtesy of Ebay, so once the concrete was dry I set about laying the floor - a portion of which is just visible.
By now it's late January and time is beginning to press. I start out laying  the raised bed only to be struck down with a Sinus infection - almost literally by the way as standing causes me to keel over.
A week later and I've recovered enough to finish the raised bed - well at least its surround and can think about the staging.
The raised be in the greenhouse
staging and potatoe binsI don't want to think about digging out the base of the bed just yet - its not a job I'm looking forward to.
So it's off to B&Q to get some decking to augment another Ebay buy.
With the staging done I can get the gravel trays filled - their first use since they came out of my wife's grandmother's greenhouse three years ago; after we were forced to clear it to sell the property after she passed away.
As I was moving bits and pieces about, including all those flower pots and seed trays stacked away in the shed, I extracted the pile of potatoes, Anya I think they are, they may be Ratte or similar, from the bench in my workshop.  The original intention had been to plant them up for potatoes at Christmas but I'd done nothing with them and they'd sprouted nicely.
With a warm(ish) place for them I decided to plant them up in the bins I'd used for last years, experimental, crop. It's one thing growing potatoes in bins its quite another to get a decent crop out of them - I shall give them far more water this year. So I extracted the bagged soil/compost mix, added some fresh compost and blood and bone and planted them up 6 to a bin.  I'm hoping they'll be ready for early June.
So with the calendar rapidly heading into March I was forced to start the laborious task of ground preparation.
I started with what is to be the Runner Bean bed along side the Greenhouse. At that point I still had to find a source of free manure and was forced to rely on what little mulched hedge clippings and saw dust I had available - anything to hold moisture is better than nothing.
I then ran into what has been the bane of my life for the last year and a bit - tree roots; from that great silver birch your can see in the background behind the green house. I've since discovered they run all the way across my garden and into the new vegetable plot - well they did!
Now as this is all new ground it's being double dug - in the case of the bean bed this meant only taking out a bed 2' wide by 12' long and loading it into one of my spare builders bags. For the main bed  this becomes 4 spades wide by 8' in length. Now a builders bag holds 0.8 cubic meters, which is approximately 1 tonnes when normally loaded. Filling it to the brim, which is what it takes for the 4 spades by 8' trench is about 1.5 tonnes. Why did I do it this way ?
Double trench digging view 1
Double Trench digging view 2Well there are 4 reasons
  1. Tree and Shrub roots
  2. Chaffer grubs and other beetle larvae
  3. A (big)pile of couch grass roots to dispose of
  4. the ability to trench dig the second spit
These are all sort of interrelated. The tree and shrub roots make an ideal breeding ground for the chaffer grubs and beetle larvae, along with cutworm and the odd wire worm.  Turning the second trench gives me a better chance of spotting and removing the grubs, and larvae, and I can also get the roots out easier. It does of course mean extracting another 2 spades by 8' into another builders bag.
So I'm now in the first week of March, and have discovered not only a free source of manure, not too far away, but also the Allotment Forum.
With the manure I can begin digging in earnest.
Into the bottom of my nice trench I can now throw a layer of couch grass and other assorted rubbish safe in the knowledge it has no chance of growing before they rot or the soil eats them - no I'm not joking..
With the layer of rubbish in I can  now turn the remainer of the trench giving me a  trench 2 spades wide by 2 spits deep plus a step 2 spade wide by 1 spit deep..
Starting the next 'row' I  cut the grass as turfs and place them on the step. This also helps to stabilize the edge and keep the manure where I want it. I now add a layer of manure, and then turn the row on top of it.
I'm now back where I was an hour ago but 16" down the length of the vegetable patch. That's the only current advantage of my soil its light and easy to dig - and yes it is as dry as it looks - no wonder we have a hose pipe ban.

If you're wondering what I did with the tree roots extracted from the bean bed, the inside of the green house, the green house footings, and the 9' of vegetable patch dug so far then look a little closer - they've become ash to be raked in when I level the plot out.
Moving the trench along
Last Summers ProjectThe other thing having the manure has allowed me to do is add some to last summers other project and the rasperry bed..
When we moved in several years ago this boundary was a Leylandi hedge. Anyway, a couple of years ago we had the money to buy the materials for the fence and last spring I had the time to clear the hedge and erect it.
Now our neighbors garden is for the most part higher than ours. Close to the house its about 12", dropping to nothing, before rising to about 4" again behind the greenhouse.
I've taken advantage of this and put in a staggered raised bed which follows the fence height. The timber for this was another Ebay buy - a good one at that since not only did it do this bed, but the surround for the new shed, the new shed base, and its frame work - I had to buy the cladding and roofing board.
Last year it had 4 wigwams of runner beans along its length, plus sweet peas growing up the fence.
It also has the remains of last years cabbages which were thoroughly destroyed by every variety of cabbage eating caterpillar in the neighbor hood despite liberal planting with marigolds.
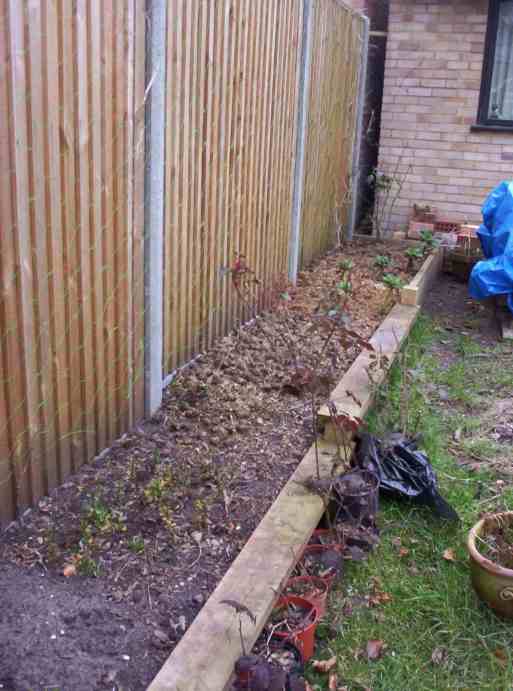
Eventually it will have fruit trees along the fence, but this year we're going to try strawberries.
These should complement the raspberries nicely. Last year we had about 20lbs out of this small bed and were picking from early September into early November.
We grow the late raspberries as they're, supposedly, self supporting.
With the weight of fruit however we have to provide a little support, hence the fence stakes, to keep them off the ground and away from the slugs, snails, and mice.
If the daffodils intrigue you, then they're about two weeks ahead of everywhere else locally due to the sheltered nature of this bed.
We may also get Blue Tits nesting in the box this year. It didn't go up until May last year so missed the early season, but they're showing an interest already so maybe we'll be lucky this year.
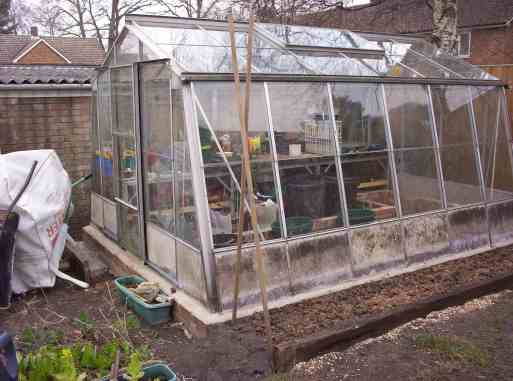
If you look carefully in the first picture you'll also see I've got a robin box up - so far ignored by the robin's. I've also been cultivating a young blackbird by feeding him chaffer grubs, beetle larvae, cut worms, etc. The trouble is he's got sufficiently tame to steal worms whilst I'm digging.
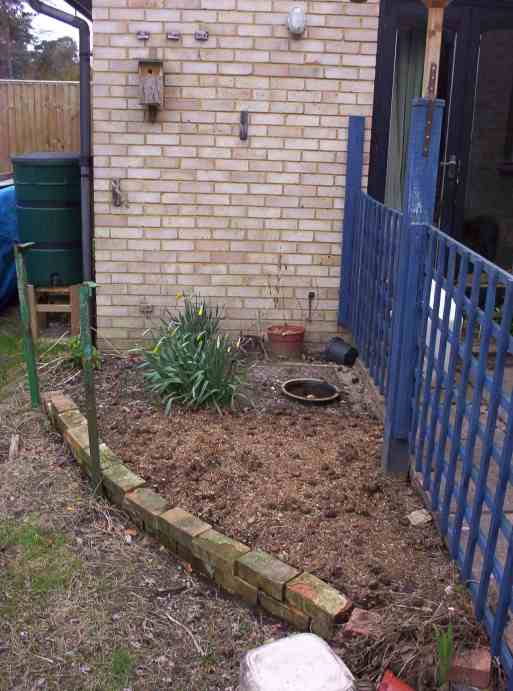
The Raspberry Bed